How to Plant and Propagate Bucephalandra in a Freshwater Aquarium
Bucephalandra, often called "Buce," is one of the easiest aquarium plants to kill by doing the one thing that feels most natural: planting it like a rooted stem. This guide covers exactly how to attach it correctly, keep it healthy under real-world water and light conditions, and split a mature clump into new plants using nothing more than clean scissors.
Why Bucephalandra Isn't Planted Like Other Plants
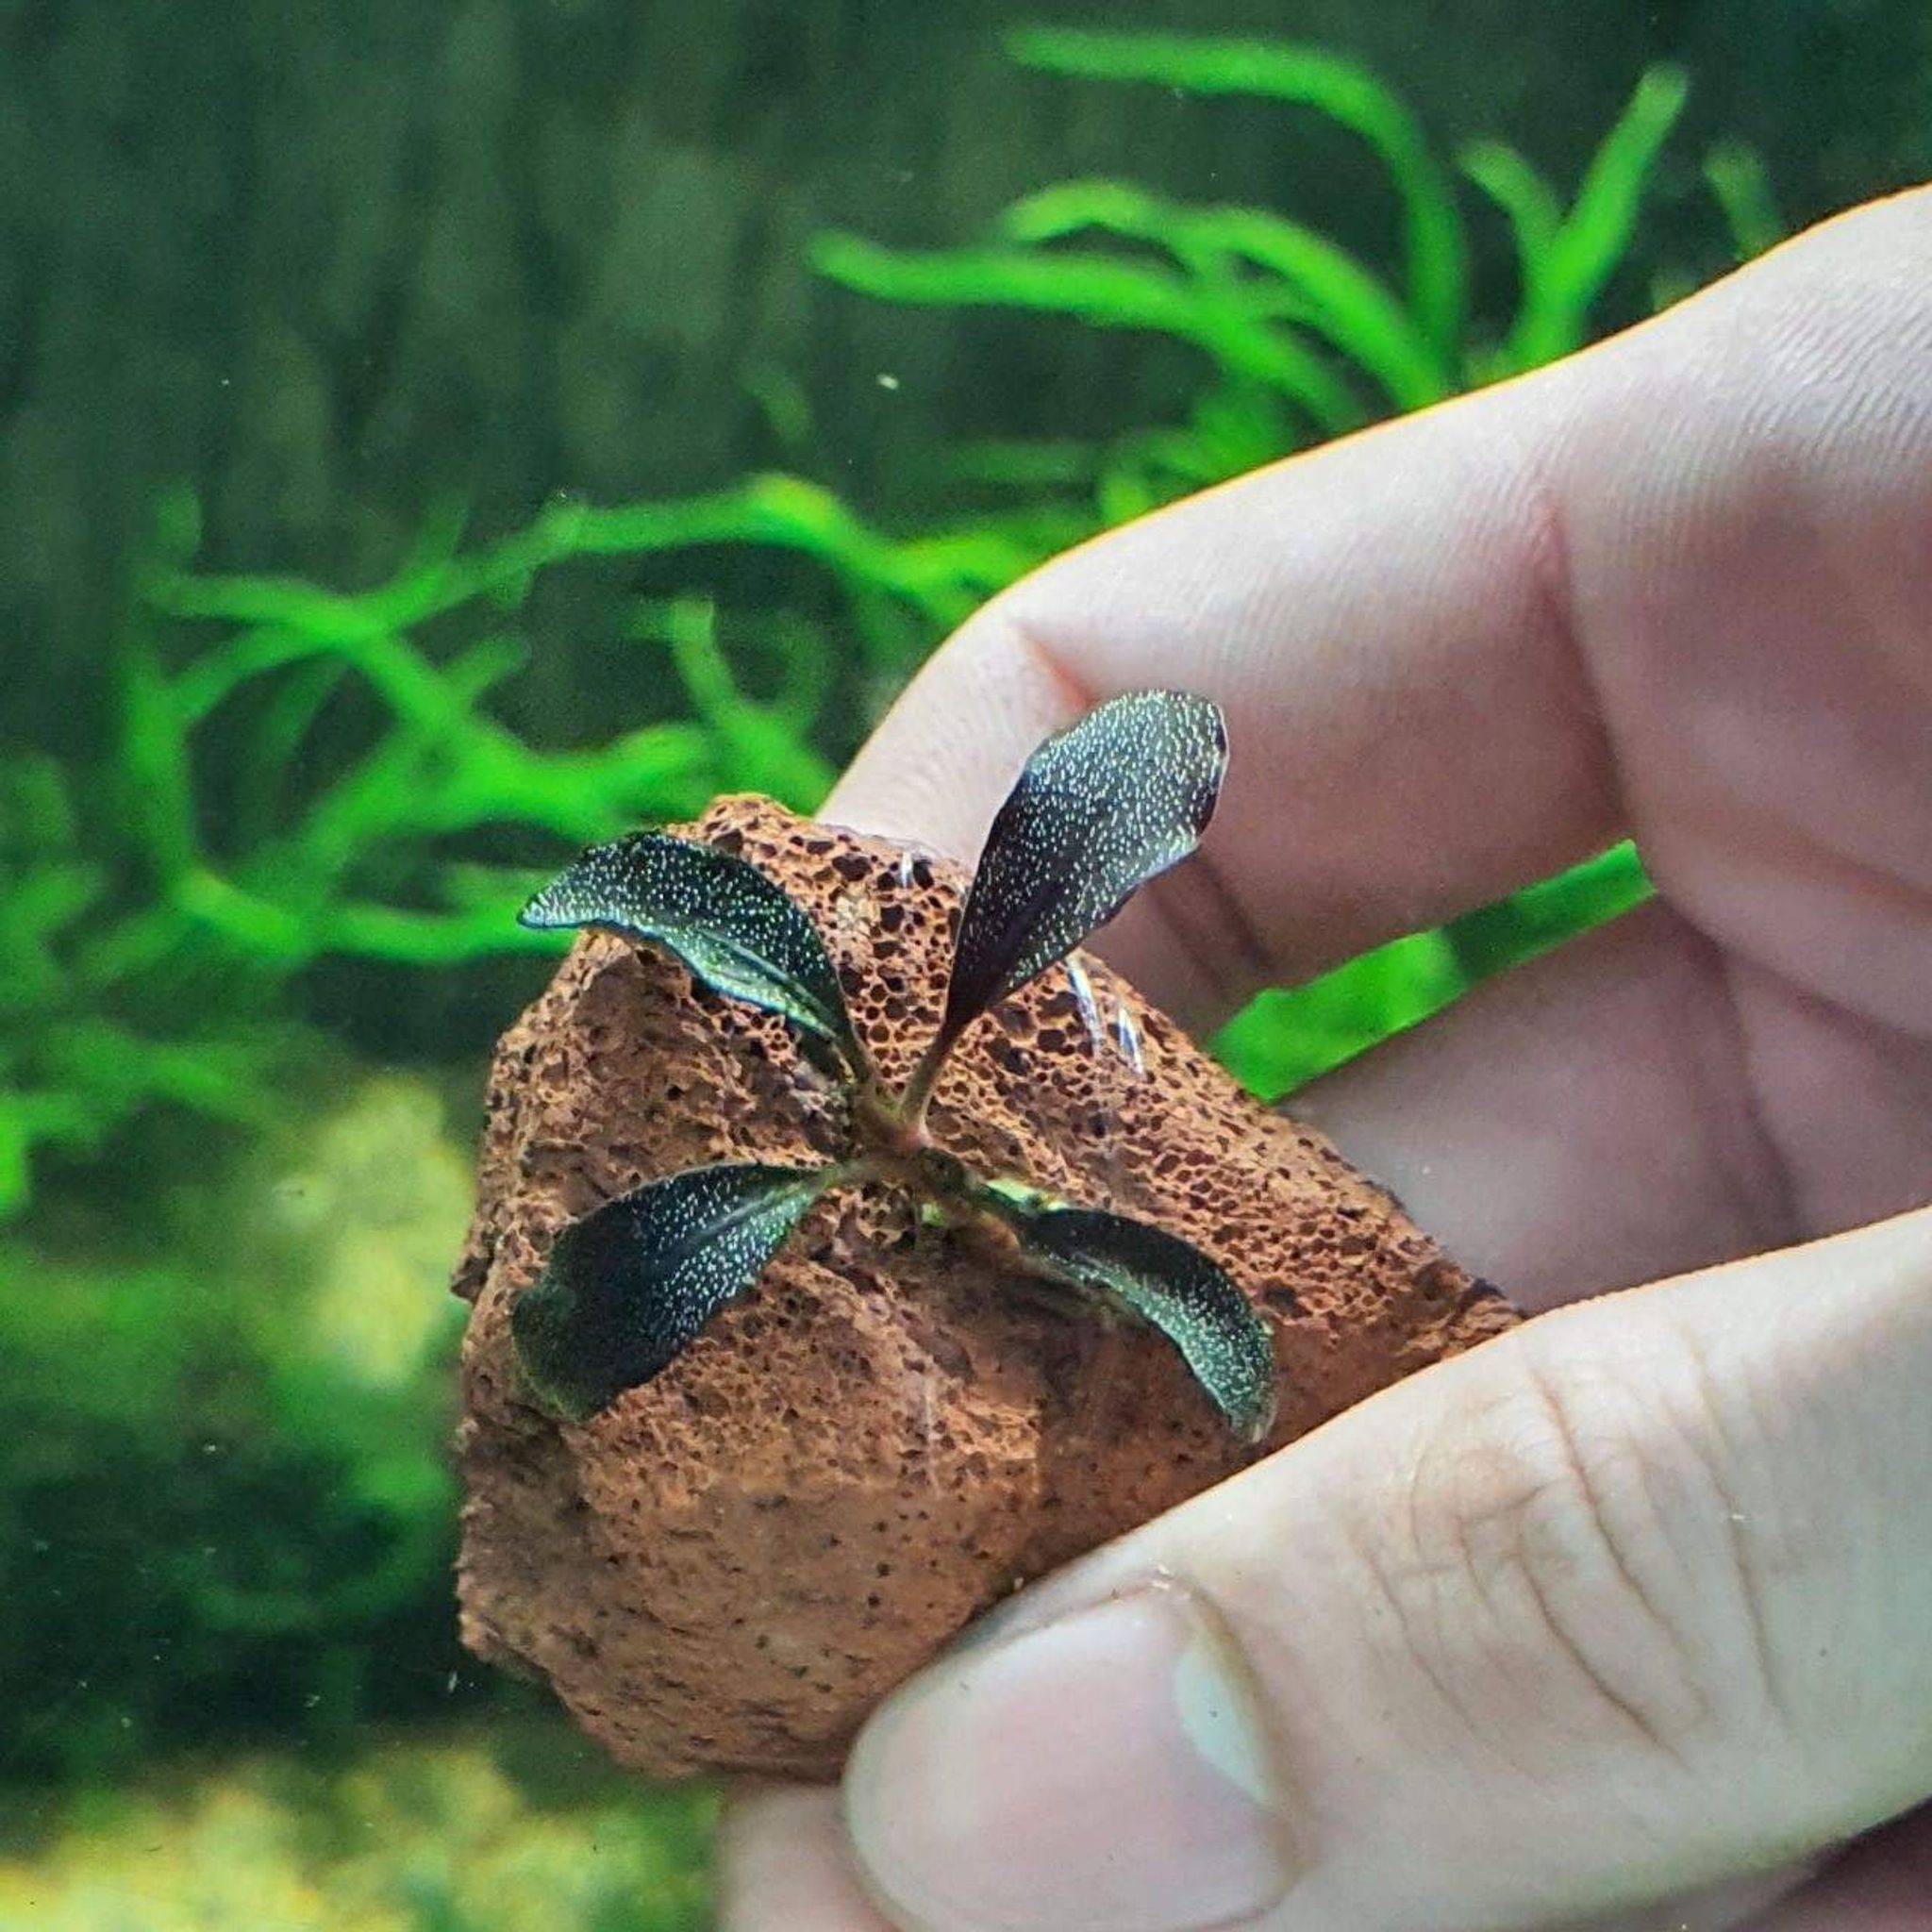
Bucephalandra is a rhizome epiphyte native to fast-flowing streams in Borneo, where it grows attached to submerged rocks and driftwood rather than rooted in soil. In the aquarium, it behaves the same way — it needs a hard surface to hold onto, not a bed of substrate to grow in.
The thick horizontal stem running along the plant's base is the rhizome. This is the structure that produces new leaves and, later, new plants through division. It is not a root, and it should never be pushed into gravel or sand. Only the thin, wiry roots that grow from the underside of the rhizome belong in substrate or pressed against hardscape.
The One Rule That Matters Most
Burying the rhizome is the single most common cause of Bucephalandra failure. Because the rhizome depends on water flow and oxygen exchange across its surface, sealing it under substrate cuts off that exchange and the tissue rots from the inside out — often before any external symptoms appear. If you remember nothing else from this guide, remember this: roots go in or against the substrate; the rhizome stays exposed to the water.
How to Attach Bucephalandra to Hardscape
There are three reliable attachment methods, and none is objectively "correct" — they suit different situations.
- Tying it down. Cotton thread, fishing line, or thin black or green yarn wrapped gently around the rhizome and roots (never cinched tight against the rhizome itself) holds the plant in place while roots grow into the wood or rock. Cotton thread eventually breaks down in the tank; fishing line stays intact but can be snipped off once the plant has anchored itself, usually within a month or two.
- Superglue gel. A small dab of gel-type cyanoacrylate glue applied to the roots and the base of the plant — never across the rhizome — bonds almost instantly and gives a fast, permanent hold. Press the plant to the surface and hold for 30 to 45 seconds while the glue cures.
- Wedging into a crevice. Tucking the root ball into a crack in driftwood or lava rock works well for irregular hardscape and leaves no visible tie material, though it's the least secure option until roots take hold.
A fourth option — small plant weights wrapped around the root mass — works as a temporary placement tool for loose, un-mounted specimens while you decide on a final layout, but isn't meant as a long-term attachment method.
Each method has a real tradeoff: glue is fastest and most permanent but leaves no room for repositioning; thread and wedging look more natural and leave no residue but take longer to become fully secure. Pick glue when you want a fixed layout on day one, and thread or wedging when you're still arranging your aquascape.
Buying Pre-Attached vs. Loose Rhizomes
Many sellers offer Bucephalandra already glued or tied to a small piece of wood or stone. Pre-mounted plants skip the attachment step entirely, which is useful if you're new to the process or running a bare-bottom or shrimp-focused tank, since there's no loose plant for shrimp or fry to dislodge while foraging. Mounted pieces can also be repositioned within the tank without disturbing the substrate.
Loose rhizomes cost less per plant and give you full control over placement, but they need one of the attachment methods above before you can consider them "planted." Either way, the care requirements — light, flow, and fertilization — are identical once the plant is in the tank.
Water Parameters and Lighting
Bucephalandra is forgiving on water chemistry but responds strongly to light intensity, which is worth planning for before you buy.
| Parameter | Range |
|---|---|
| Temperature | 70–82°F (21–28°C) |
| pH | 6.0–8.0 (mildly acidic to mildly alkaline) |
| Water hardness | Soft to moderately hard |
| Light (PAR) | 15–50 PAR ideal; tolerates 8–10 PAR (slow growth) up to ~80 PAR (best color, higher algae risk) |
| Photoperiod | 6–8 hours, timer-controlled |
| CO2 | Not required; speeds growth and improves color/leaf size if supplied |
| Flow | Low tolerated; moderate-to-high preferred once anchored |
Reading the Light Numbers
Light guidance for Bucephalandra varies a fair amount between sources, mostly because it's a slow grower that tolerates a wide range rather than needing one exact number. Treat 15–50 PAR as the comfortable core range for steady, colorful growth. Under about 10 PAR, the plant survives but growth slows to roughly one new leaf a month. Push toward 80 PAR and you'll see deeper blue and purple hues and faster growth, but once you're near 100 PAR you're in territory where hair algae outpaces this slow-growing plant's ability to keep its leaves clean. A light fixture with an adjustable timer makes it easy to start conservatively and dial in intensity gradually.
CO2 Is a Bonus, Not a Requirement
Bucephalandra is a proven low-tech plant that grows fine without supplemental CO2 — that's part of why it's popular in low-maintenance and shrimp tanks. Where sources disagree is whether CO2 is worth adding at all; the practical answer is that it's not necessary, but it does act as a genuine accelerant, especially paired with higher light, producing larger leaves and richer color faster than a low-tech setup alone.
Fertilization and Flow
Because Bucephalandra draws most of its nutrients from the water column rather than the substrate, a weekly dose of a liquid all-in-one fertilizer benefits it more than root tabs alone. Flow matters too: once established, Buce tolerates and often prefers moderate-to-high circulation, which helps keep biofilm and algae from settling on its slower-growing leaves. During the first few weeks after attachment, though, keep newly placed pieces out of the strongest flow so they aren't knocked loose before roots have a chance to grip.
Setting Up the Tank Before You Plant
If you're building the aquascape around Bucephalandra rather than adding it to an established tank, a few setup choices make the whole process smoother:
- Substrate: Buce itself doesn't need substrate, but other plants and any bottom-dwelling tankmates usually do. Plain gravel, sand, or a nutrient-rich planted substrate all work — choose based on what else is going in the tank, and browse substrate options if you're starting from scratch.
- Driftwood prep: Boil or soak new driftwood before tying or gluing plants to it. This sterilizes the surface and leaches out excess tannins that would otherwise tint the water and slow the wood from waterlogging properly.
- Lighting and CO2 ramp-up: Start both conservatively (around 6–8 hours of light, minimal or no CO2) and increase gradually over several weeks rather than running full intensity from day one.
- Circulation layout: Position hardscape so flow reaches all corners of the tank evenly, avoiding dead zones where detritus and biofilm accumulate.
- Settling-in period: Expect the first few weeks to require more frequent partial water changes than usual while newly attached plants root in and the biological filter matures.
Understanding Melt: Why New Bucephalandra Looks Like It's Dying
This is the point where most beginners panic, and it's worth explaining clearly: melt is normal, not a death sentence.
Most nursery-grown Bucephalandra is raised emersed — above the waterline, in humid but non-submerged conditions. When you submerge it in your aquarium, the leaves that grew in air are often not built for life underwater. Over the first few weeks, it's common for some or all of those original leaves to yellow, blacken, or dissolve outright. This is the plant shedding tissue it can no longer support, not the rhizome itself failing — the rhizome stores the energy reserves needed to regrow.
What Recovery Actually Looks Like
Once the plant adapts, growth follows a predictable pattern:
- Small reddish shoot spikes appear along the rhizome.
- Those shoots elongate into young, reddish-purple leaves.
- Leaves enlarge and gradually darken into mature green or purple coloration.
How to Tell Recovery From a Dying Plant
The rhizome itself is the diagnostic. A rhizome that stays firm to the touch and greenish or its natural color, even with every leaf gone, is very likely to push new growth within a few weeks. A rhizome that has turned black, feels mushy, or crumbles under light pressure is dead tissue and should be trimmed away with a clean cut, preserving any firm, healthy section behind it. Leave a bare or melting rhizome exactly where it's attached during this period — moving it adds stress on top of the adjustment it's already going through.
How to Propagate Bucephalandra by Division
Propagation is simply cutting the rhizome into sections, each of which grows into an independent plant. It's a low-risk process as long as you wait for the right moment.
When a Section Is Ready to Divide
Look for a rhizome section with at least 3–5 leaves, or a spot where the rhizome shows a natural branching node or bend — these points already have the internal structure to support a new, independent growth center. A young plant with only one or two leaves and no visible node usually isn't established enough to split successfully yet; giving it more time before cutting improves the odds that both resulting pieces thrive.
Step-by-Step Division
- Identify a healthy section with several leaves and, ideally, roots already growing from it.
- Using sharp, clean scissors or a razor, make one straight cut across the rhizome at the chosen point.
- Each resulting piece — as long as it keeps its leaves and any attached roots — is now a self-sufficient plant.
- Attach each new piece to hardscape using any of the attachment methods above.
New growth on a freshly divided piece typically becomes visible within a few weeks to a couple of months, following the same shoot-then-leaf pattern described in the melt-recovery section. Dividing a rhizome doesn't stress the plant the way melt does, since you're cutting mature, established tissue rather than adjusting to a new environment.
Routine Trimming
Outside of propagation, you can trim individual damaged leaves as close to the rhizome as possible without harming the plant. Overgrown holdfast roots — the tangled roots that anchor the plant rather than feed it — can also be trimmed back freely; removing them doesn't affect nutrient uptake since Bucephalandra feeds mainly through the water column.
Companion Planting and Tankmates
Bucephalandra's slow growth and tolerance for shade make it a natural fit for tanks built around invertebrates rather than fast-growing centerpiece plants.
- Shrimp: Neocaridina and Amano shrimp graze biofilm off Buce leaves without damaging the plant, and its dense leaf structure gives smaller shrimp places to hide and molt safely. Browse freshwater shrimp if you're planning a shrimp-and-plant tank.
- Snails: Nerite and assassin snails, and ramshorn or bladder snails in moderation, help keep biofilm and algae film off leaves in the same way.
- Moss: Attaching moss to nearby hardscape gives shrimp additional grazing and hiding surface, complementing Bucephalandra rather than competing with it for space.
A common sequencing mistake is adding a full cleanup crew immediately after planting. It's generally better to wait a few weeks until the tank has matured biologically before introducing shrimp and snails, giving the biofilm they feed on time to establish and giving the tank's nitrogen cycle time to stabilize.
Common Mistakes and Troubleshooting
| Mistake | What Happens | Fix |
|---|---|---|
| Burying the rhizome | Rot from lack of oxygen/flow | Keep rhizome fully exposed; only roots touch substrate |
| Discarding a melting plant | Healthy rhizome tissue thrown away | Wait several weeks; judge by rhizome firmness, not leaf loss |
| High light/CO2 without enough flow or nutrients | Algae and biofilm coat slow-growing leaves | Increase flow, dose fertilizer weekly, or reduce photoperiod |
| Gluing over the rhizome | Suffocates growing tissue | Apply glue only to roots and base, never the rhizome |
| Placing new mounts in strong flow immediately | Plant gets knocked loose before rooting | Keep new placements in gentler flow for the first few weeks |
| Overcrowding one mount with too many pieces | Restricted flow around leaves, algae buildup | Space rhizome sections out across more surface area |
| Skipping quarantine/dip on new stock | Snail or algae-spore hitchhikers spread to the tank | Rinse and inspect new plants, or dip before adding to an established tank |
A quick pre-planting dip — rinsing the plant thoroughly and checking leaf undersides and rhizome crevices for snail eggs or visible algae — takes a few minutes and meaningfully reduces the chance of introducing unwanted hitchhikers into a mature tank.
Frequently Asked Questions
Is it normal for new Bucephalandra to melt or lose leaves after planting?
Yes. Most nursery stock is grown emersed, so leaves that formed in air often can't survive underwater and shed as the plant adjusts. Keep the rhizome in place and check back in a few weeks — new growth usually follows if the rhizome stays firm.
Do I need CO2 or high light to grow Bucephalandra?
No. It's a well-proven low-tech, low-light plant that grows steadily at 15–50 PAR without CO2. Adding CO2 or pushing light higher only speeds growth and deepens leaf color — it isn't required for the plant to survive.
How do I attach Bucephalandra to driftwood or rock?
Tie it with cotton thread, fishing line, or thin yarn, dab superglue gel onto the roots and base, or wedge the root ball into a crevice in the hardscape. In every case, keep the rhizome itself exposed to water rather than buried or glued over.
How long until I can propagate (split) my Bucephalandra?
Once a rhizome section has at least 3–5 leaves or shows a natural branching node, it's ready to divide — this typically takes a few months of steady growth from a newly planted piece.
Can Bucephalandra grow emersed or in a paludarium?
Yes. It naturally grows partly emersed along Borneo streambanks in the wild, and it adapts well to paludarium or riparium setups, where emersed growth often multiplies faster than a fully submerged tank.
Is Bucephalandra safe with shrimp and snails?
Yes, it's one of the more popular plants for shrimp and invertebrate tanks. Grazing shrimp and snails clean biofilm off its leaves without eating the plant itself, and its leaf structure gives smaller shrimp safe places to hide.
Why are my Bucephalandra leaves growing algae or biofilm?
This usually points to more light or nutrients than the current flow and plant mass can handle. Increase circulation, shorten the photoperiod slightly, or add a small grazing cleanup crew of shrimp or snails to keep leaves clean.
Bucephalandra rewards patience more than any other single input — correct attachment and realistic expectations around melt matter more than chasing a perfect PAR number. Once you've got a healthy mount established, browse freshwater plants and livestock on FishyHub to round out the rest of your aquascape.


